
Many moons ago (2003) I did a PGCE in secondary science, most of which seemed to be teaching sex education every other week. There were many lows and a few highs, one of which was a particular lesson that I did based on my degree (biochemistry). More recently I referred to this lesson in a tweet:
@NQTUK my favourite science lesson ever was genetics with Y12. Did a whole mocked up cloning thing with phages and all sorts. Was ace 😊
— Martin Saunders (@MartinGSaunders) March 16, 2016
A couple of people asked about my lesson plan but unfortunately this is long gone. I thought it was worth trying to explain a bit of what we did though and how I adapted the real science to fit a classroom full of 16 & 17 year olds.
The Theory
In this protocol we will be taking a gene of interest and cloning it into bacteria, who will then go on to express this gene as a protein for our mythical purpose. The reason for doing this isn’t really all that important but this is a stock procedure in molecular biology and could just be a convenience issue if we want lots of a given protein for structural biology. If we were being a bit more Despicable Me we might be creating some kind of super-bacteria that will digest concrete or spilled oil if we’re feeling nice. Anyway, there’s some bacteria, a gene and a protein; that’s all that matters.
We start with a plasmid vector, lets say pBR322. pBR322 is one of the most common and best known plasmids in molecular biology and even has its own Wikipedia page. A plasmid is a little loop of DNA that replicates separately from chromosomal DNA. They occur in nature conferring beneficial attributes to the host but can be utilised by cunning scientists to manipulate bacteria into expressing extra genetic stuff… Sneaky huh?!
pBR322 looks like this:
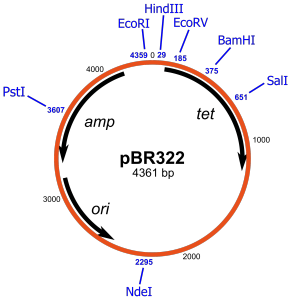
The key things to note are that pBR322 has a number of Restriction Endonuclease sites: Pst1, EcoR1,HindIII, BamHI etc. These are specific DNA sequences that are cut by a given enzyme; a restriction endonuclease. The endonucleases themselves are named after the bacteria that the enzyme originates from. Eco… from E Coli, Bam… from B Amyloliquefaciens and so on. On the inside of the diagram there are three regions. Amp and Tet which confer ampicillin and tetracycline resistance respectively to the host bacteria and “ori” which is the “origin of replication” and allows the plasmid to be duplicated within the host bacteria. Also “bp” stands for base pairs in case you were wondering, a base being a nucleotide, a nucleotide being… never mind.
Now we have our plasmid we need to introduce our gene of interest. We’ll assume that we have this gene and in practice this would probably have been manufactured in a DNA synthesis machine. For random trivia I used to work at a company that did this and the chemistry is really easy. So, we take our plasmid (probably in 40µl of clear liquid) and we add our restriction endonuclease to cut open the plasmid. We would leave our plasmid and restriction endonuclease to incubate at 37º for a little while to digest. In practice you would then treat with a phosphatase to remove the 5′ phosphate group and prevent the plasmid from self-ligating (joining back up again). I found this video a good explanation HERE. After this we would separate the DNA from proteins in our “restriction digest” by e.g. separation in phenol (nasty stuff but smells lovely) or electrophoresis.
Now we have an open plasmid we need to insert our gene so we introduce this DNA and an enzyme called DNA ligase, which joins the two together. The de-phosphorylation above makes sure we don’t just join back up with no gene and we might be cunning and use two different RE sites to ensure different ends are required to join the plasmid back up, ensuring only one copy of the gene. Now we have to purify and separate again. We do this by gel electrophoresis using the fact that DNA is full of phosphates so quite negatively charged. After a little time we will end up with bands of DNA corresponding to the length. Usually we would have some plasmid with no gene and lots with one copy. We cut out the electrophoresis gel corresponding to our plasmid plus insert and there we have our prepared plasmid, stuck in a bit of jelly.
I found this page about restriction endonucleases and electrophoresis which seems to make some sense.
Next job is to get our plasmid into the bacteria, E Coli in our case. We can do this “transformation” in a few ways. The easiest is probably “heat shock” which is just a case of cycling from hot (42º) to cold (ice) a few times. This link gives a good set of details. We end up with a little Eppendorf tube containing mostly clear liquid (this is most of what genetics looks like) that holds our transformed bacteria. All we need to do now is to spread the bacteria on antibiotic-laced agar plates. The standard thing is to do this next to a Bunsen burner if I remember rightly so that the up-draught takes other nasties away from the sterile plates. Then we incubate overnight and hopefully end up with some nice little colonies of bacteria with our gene cloned in. Cue evil laughter.
See this Wikipedia page for a good run through of the process.
The Practice
So, I have a slight confession to make to the Wolverley High School A-Level class of 2004. I faked it. Sorry. It could have been true though 🙂 Back then (and probably now still) you had to have a licence from the Home Office in order to perform genetic manipulation. Kinda makes sense.
You have to get special Home Office permission to do this stuff for real so you lot are pretty lucky 😂
Anyway, confession aside, there are a few steps which are a pain in the back-side. I started from a script that I followed in my undergraduate molecular genetics practical class and that was for a 3 hour session so getting it down to a 1 hour lessen was always going to take a bit of compromising. What I skipped really were the purification steps and some of the incubation times. I was lucky in that I found some kits for DNA gel electrophoresis which I think came from a forensics thing. This gave me agar gel and little electrophoresis setups. This is the kind of thing here. I vaguely remember that the kits might have been made by the company that I went on to work at afterwards so I might be able to get some of the ones I used if I really wanted to…
Essentially, this was a lesson based around gel electrophoresis and bacterial plating on agar. The rest was a bit of theatre and lots of colour-coded Eppendorfs! The kids loved it though and really took it seriously (they had Home Office approval after all) and the buzz of the school was that Y12 did cloning for quite some time. In retrospect it was a bit of an out-there lesson but I’m proud of it and I hope that maybe I inspired a few people to go on and study science further.